
How to Maximize SEO in Zendesk
Zendesk, a customer service company aimed at improving customer relationships with businesses, allows you to interact with customers by any channel they prefer (e.g., phone, chat, email, social, etc.). In addition to making the customer service experience as smooth as possible, Zendesk also allows companies to house their help centers and knowledge bases on the platform. This allows you to organize and create support content for your customers to access easily. One example of this is an FAQ section, which allows customers to easily find answers to the most common questions they may have about a company’s product or service.
With thousands of companies using Zendesk as a knowledge base and help center, how do you maximize SEO? After all, that knowledge base isn’t on the company website, but rather housed on Zendesk.
One tool to boost SEO is utilizing XML sitemaps, which are simply text files with important information about your company’s website (or in this case, help center). Providing Google with a sitemap tells the search engine that you believe your pages are worthy enough to be indexed. It is important to note, however, that a sitemap isn’t enough to be indexed. Your page content must also be high quality and relevant.
The key takeaway here: Having a sitemap is only one small part of enhancing SEO for your website or help center.
If you have a client like some of ours, who uses Zendesk as a help center for their customers, you may be wondering how you can leverage the content on there from an SEO standpoint. And if you’ve found this article, you’ve probably read Zendesk’s guide on how to utilize Sitemaps and found it unhelpful (like we did). Well, look no further, because in this blog we are going to provide you with the simplest way to use XML sitemaps on Zendesk to help boost your SEO potential.
Part 1: The Setup
Before touching the sitemap, you’ll need to log in to your Google Analytics account, which will be used later as a verification method for your Zendesk help center. If you don’t have a Google Analytics account, you’ll need to create one by following these steps:
1.) Login to Google Analytics, and create a new account for your help center. This can be done by going to Admin (bottom left corner) > Create Account. Make sure the URL you input is the URL of your help center. If you’ve never used Google Analytics before, you can use this guide on setting an account up.
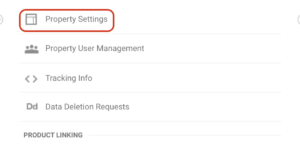
2.) After setting the account up, grab the tracking ID. This is found in Admin > Property Settings. Copy this ID, as you’ll need it soon.
Part 2: Linking Google Analytics to Zendesk
Now we need to go to Zendesk to input the tracking ID.
3.) Go to your Zendesk help center, click “Guide Admin” in the upper right corner, then click Settings (the cog wheel). Under Guide Settings, scroll down to Integrations, and check “Google Analytics.” In the Tracking ID box, paste your ID.![]()
Zendesk will integrate your tracking ID into your help center, so you will be able to view your analytics. Great! (This is also how Google will verify that you are the owner of the Zendesk center in a later step.)
Part 3: Acquiring & Uploading the XML Sitemap
Now is where the whole point of this guide comes in – getting and submitting the sitemap to Zendesk. Luckily, this is very easy to do!
4.) Using xml-sitemaps.com (which is free), input the URL of your help center. Save this sitemap, which should be a simple TXT file.
TIP: Make sure you use the full URL of your help center/knowledge base
(which will probably contain “hc/en-us” at the end, or else you’ll get an error message.)
5.) Now “submit” this sitemap to Zendesk. To do this, you simply create an article like you normally would, but add the XML sitemap as an attachment. Once you upload the article with the attachment, copy the URL of the XML file you just uploaded. 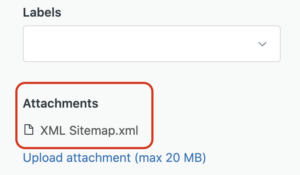 To do this, right click your attachment, and click “open in new window.”You will now be able to copy the address of the file, which should end in something like: /hc/article_attachments/360059928872/XML_Sitemap.xml
TIP: Put the article in a lesser-used section of your knowledge base.
Also, after you’ve uploaded the article and copied the URL,
you can put the article back to a draft so it won’t be visible to users.
Part 4: Submitting the Sitemap to Google
Finally, we can submit our sitemap to Google to help with SEO.
6.) Go to Google Webmaster Tools, and sign in to the Google account associated with the property you created in step 1.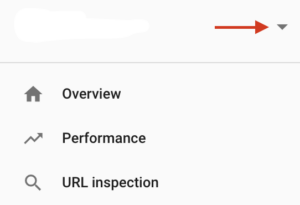
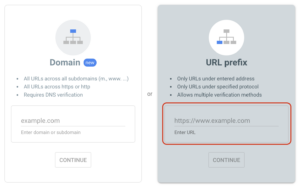
7.) Add a new property by clicking the dropdown menu above “Overview” on the upper left side of the screen and select “Add property”. When you are prompted, choose “URL Prefix” as the property type. Input the URL of your Zendesk help center, and press continue. Because your help center is already linked to Google Analytics, it should automatically verify you.
8.) Once added, click “Sitemaps” on the left side of the screen. In the box that asks you to input the sitemap URL, paste the URL that you copied earlier (the URL of the article with the sitemap attached). You will only need the last part of the URL, as the beginning will probably already be added by Google. This means you’ll be adding the part of your URL that looks something like “/article_attachments/018273918/sitemap.xml”
9.) Click submit! It should be approved immediately, and now Google is able to utilize your Zendesk center to improve SEO.
TIP: Update your sitemap regularly. If you make frequent edits to your
knowledge center, try updating and resubmitting the sitemap once a week.
There! That wasn’t so bad, was it? While there are multiple things that could go wrong in this process, this guide should have provided you with all the information needed to help set up, acquire, and submit an XML sitemap to Google.
Have a question or comment? Did we miss something that should be added? Feel free to email us at sam@marketingworks360.com.
Sam Kowalski • July 8, 2020
Posted in these categories:
Expertise, Marketing TipsWith these tags: